2.10 Enabling certificate policies
Important: You must make sure that all certificate types (on the CA) that you want to use as certificate policies in MyID have a specific certificate definition; that is, they have a specified user policy for that certificate type on the CA. You can change the user policy if required; MyID picks up the updated definition for the certificate policy when it next synchronizes with the CA.
Note: You are recommended to set up your Entrust certificate policies to have a single key size and type.
Although all certificate policies are detected when you add the CA to MyID, they are all initially disabled. To enable them:
-
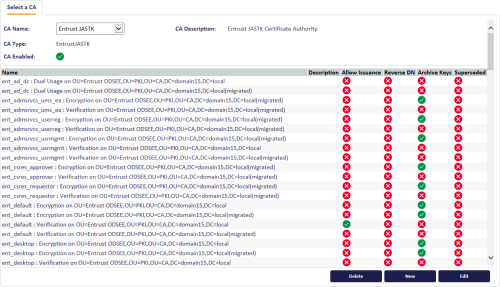
From the Configuration category, select Certificate Authorities.
-
From the CA Name drop-down list, select the certificate authority you want to work with.
-
Click Edit.
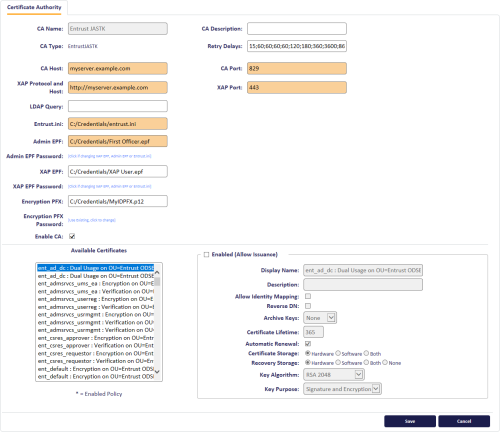
- Make sure Enable CA is selected.
- Select a certificate template you want to enable for issuance within MyID in the Available Certificates list.
- Click the Enabled (Allow Issuance) checkbox.
-
Set the options for the policy:
-
Display Name – the name used to refer to the policy.
-
Description – a description of the policy.
-
Allow Identity Mapping – used for additional identities. See the Additional identities section in the Administration Guide for details.
-
Reverse DN – select this option if the certificate requires the Distinguished Name to be reversed.
Note: MyID does not recognize this option when using the Issue Card workflow to issue a card.
-
Archive Keys – select whether the keys should be archived.
If you have set up the keys to be archived in Entrust, this option displays either Entrust (for migrated policies) or Entrust JASTK, and you cannot change the option.
Otherwise, you can select one of the following values from the drop-down list:
-
None – the certificates are not archived.
-
Internal – the certificates are archived in the MyID database.
-
Secure Vault – if you have MyID SecureVault installed, you can select Secure Vault to archive the keys in the MyID SecureVault database. For more information, see the Integrating with MyID SecureVault section in the Administration Guide.
-
-
Certificate Lifetime – the life in days of the certificate. You can request a certificate from one day up to the maximum imposed by the CA. For example, type 365 to request one-year certificates.
Note: The default certificate lifetime value in MyID is 365 days. The default in Entrust is 36 months; if you want to configure MyID to match the Entrust default, enter 1095 days.
- Automatic Renewal – select this option if the certificate is automatically renewed when it expires.
-
Certificate Storage – select one of the following:
- Hardware – the certificate can be issued to cards.
- Software – the certificate can be issued as a soft certificate.
- Both – the certificate can be issued either to a card to as a soft certificate.
-
Recovery Storage – select one of the following:
- Hardware – the certificate can be recovered to cards.
- Software – the certificate can be recovered as a soft certificate.
- Both – the certificate can be recovered either to cards or to a soft certificate.
-
None – allows you to prevent a certificate from being issued as a historic certificate, even if the Archive Keys option is set.
If the Certificate Storage option is set to Both, the certificate can be issued to multiple credentials as a shared live certificate, but cannot be recovered as a historic certificate.
-
Additional options for storage:
If you select Software or Both for the Certificate Storage, or Software, Both, or None for the Recovery Storage, set the following options:
-
CSP Name – select the name of the cryptographic service provider for the certificate. This option affects software certificates issued or recovered to local store for Windows PCs.
The CSP you select determines what type of certificate templates you can use. For example, if you want to use a 2048-bit key algorithm, you cannot select the Microsoft Base Cryptographic Provider; you must select the Microsoft Enhanced Cryptographic Provider. See your Microsoft documentation for details.
- Requires Validation – select this option if the certificate requires validation.
-
Private Key Exportable – when a software certificate is issued to local store, create the private key as exportable. This allows the user to export the private key as a PFX at any point after issuance.
It is recommended that private keys are set as non-exportable for maximum security.
Note: This setting affects only private keys for software certificates – private keys for smart cards are never exportable.
Note: By default, when MyID issues software certificates, it encrypts the passwords protecting the PFX files using AES256/SHA2. However, some Operating Systems do not support this modern security standard, which creates a problem when importing the certificates onto these; for example, any Apple OS (macOS or iOS), any Windows Server OS lower than Windows 2019, and any Windows client OS lower than Windows 10 build 1709. If you want to import software certificates onto an OS that does support not the encryption of PFX files using AES256/SHA2, you must set the Use SHA1 encryption for certificates issued as PFX files option in the Server tab of the Security Settings workflow to Yes.
-
User Protected – allows a user to set a password to protect the certificate when they issue or recover it to their local store.
This means that whenever they want to make use of the soft certificate, they will be prompted for a password before they are allowed to use it. This is a CSP feature that is enabled when you set this option, and affects only software certificates that are issued or recovered to local store for Windows PCs.
-
-
Key Algorithm – you must configure the key algorithm on the Entrust server. This option is display-only within MyID.
Note: MyID expects a certificate policy to have a single key algorithm and key size (for example, RSA 2048). Within the Certificate Authorities workflow, the Key Algorithm option for a certificate policy shows a single combination of algorithm and key size. You must ensure that this matches the settings for the certificate policy on the CA.
-
Key Purpose – you must configure the key purpose on the Entrust server. This option is display-only within MyID. The key purpose can be one of the following:
- Signature – the key can be used for signing only.
- Signature and Encryption – the key can be used for either signing or encryption.
Note: The Key Purpose option has an effect only where the device being issued supports the feature. PIV cards do not support this feature, while smart cards issued with minidrivers and software certificates issued to local store for Windows PCs do support this feature.
-
-
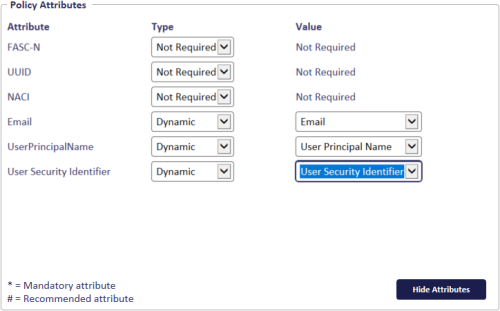
If you need to edit the policy attributes, click Edit Attributes.
-
For each attribute, select one of the following options from the Type list:
- Not Required – the attribute is not needed.
- Dynamic – select a mapping from the Value list to match to this attribute.
- Static – type a value in the Value box.
- Click Hide Attributes.
For information on mapping attributes for PIV systems, see section 2.13, Attribute mapping for PIV systems.
Note: MyID may not override the settings of the CA. You need to obtain the correct settings from the administrator of your CA.
-
-
Click Save.
Note: Changes made to certificate profiles do not take effect immediately, as the normal interval for MyID to poll for updates is 50 minutes. To force MyID to poll for changes immediately, you must manually restart the eKeyServer service, then restart the eCertificate service.
2.10.1 Controlling certificate lifetimes
For PIV compliance and the desire to enable finer control over the issuance of certificates, MyID provides a certificate-based operation setting to constrain certificate lifetimes to the lifetime of the credential. That setting means certificate requests potentially, and by default are, restricted to lifetimes with their associated credential.
You can configure MyID to use the CA default lifetimes instead; typically, this is 36 months. MyID stores a representative value in the EnProfileTemplates table in the MyID database; however, individual CA instances may vary. When you enable this option, MyID is given whatever that particular instance is using for its 'user default key update policy'.
To set up MyID to use the CA default lifetimes:
- From the Configuration category, select Operation Settings.
- Click the Certificates tab.
-
Set the following option:
-
Use Entrust default key update policy
Set this value to Yes to use the CA's default lifetimes.
Set this value to No to constrain certificate lifetimes to the lifetime of the credential.
-
- Click Save changes.
Entrust maintains a single value for all users however on a user by user basis, and therefore their certificate requests can have a specific or the default policy in place.
2.10.1.1 Effect on escrowed encryption certificates of allowing the CA to control lifetimes
If you have set the Use Entrust default key update policy option to Yes, and the CA is in control of certificate lifetimes, the behavior of Entrust when issuing encryption certificates is different. When MyID controls the lifetimes, when you issue an encryption certificate, Entrust always issues a new certificate. However, when Entrust controls the lifetimes, it issues a new encryption certificate only if there is not an existing escrowed encryption certificate; if there is an existing escrowed active encryption certificate, Entrust issues a copy instead.
Note, however, that if the existing certificate is expiring, Entrust issues a new certificate rather than recovering a copy.
2.10.2 Forcing the issuance of new escrow certificates
To force Entrust to issue new escrow certificates:
- From the Configuration category, select Operation Settings.
- Click the Certificates tab.
-
Set the following option:
-
Entrust force new escrow
When this option is set to Yes, if Entrust returns an existing escrow certificate in response to a request for a new certificate, MyID revokes the certificate and requests the new certificate again.
The default is No.
-
- Click Save changes.
Note: Setting this option returns MyID to its previous behavior; you are recommended to keep this option at the default No for most systems, and set this option to Yes only if directed to by Intercede.


